1 ක්රමය.
යූ.එස්.බී. කනෙක්ෂන්
-මේකට ඔයාලට ෆෝන් එකත් එක්ක එන ඩේටා කේබල් එක අවශ්ය වෙනවා.මෙන්න පියවර ටික.
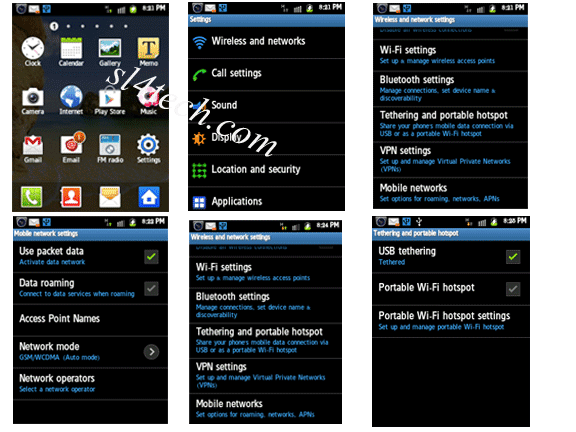
1) යූ.එස්.බී. කේබලයෙන් පරිගණකය හා ඇන්ඩ්රොයිඩ් ඩිවයිස් එක සම්බන්ධ කර ගන්න.
2) දැන් හෝම් බට්න් එක ඔබලා,ඊට පස්සේ මෙනු බට්න් එක ඔබන්න.
3) සෙටිංස් වල ටෙදරින් පෝටබල් හොට්ස්පොට්.
4) යූ.එස්.බී. ටෙදරින් තෝරලා කොම්පීටරේ පෙන්වන කනෙක්ෂන් එකෙන් සෙට් වෙලා අන්තර්ජාලයට පිවිසෙන්න.
USB Connection
Step 1
Connect the USB cable's smaller end to your Android phone and the other end to your computer.
Step 2
Press the "Home" button and then the "Menu" button.
Step 3
Tap "Settings," "More" from the Wireless & Networks section and then "Tethering & Portable Hotspot."
Step 4
Check "USB Tethering" to establish a USB data connection on your computer. Uncheck the option to sever the connection.
2 ක්රමය.
බ්ලුටුත් හොට් ස්පොට්
-මේකට ඔබේ කොම්පීතරේ බ්ලුටුත් තිබිය යුතුයි.විශේෂයෙන්ම බ්ලුටුත් තියෙන ලැප්ටොප් වලට මේක වැදගක් වෙයි. නැතිනම් වෙළදපොලෙන් අඩුවට බ්ලුටූත් ඩොංගලයක් මිලදී ගන්න පුලුවනි.
1) ඇන්ඩ්රොයිඩ් මෙනුවෙන් සෙටිංස් තෝරන්න.
2) වයර්ලස් නෙට්වර්ක් වලින් බ්ලුටුත් තෝරන්න.
3) බ්ලුටුත් ඔන් කරලා “හොට් විසිබල් ටූ අදර් බ්ලුටූත් ඩිවයිසස්“තෝරන්න.
4) දැන් ඔයාලාගේ කොම්පීතරෙන් ස්ටාර්ට් ඩිවයිසස් ඇන්ඩ් ප්රින්ටර්ස් ඇඩ් ඩිවයිස් තෝරන්න.
5) පෙන්වන ලිස්ට් එකෙන් ඔයාලගේ ඇන්ඩ්රොයිඩ් ෆෝන් එක තෝරලා නෙක්ස්ට් තෝරලා ඔයාලගේ ෆෝන් එක ෂෙයාර් කර ගන්න.
6) බැක් බට්න් එක ඔබලා මෝර් වලින් ටෙදරින් පෝටබල් හොට්ස්පොට් තෝරන්න.
7) බ්ලුටුත් ටෙදරින් තෝරලා අන්තර්ජාලයේ සැරිසරන්න.

Bluetooth Hotspot
Step 1
Press "Home" and then "Menu."
Step 2
Tap "Settings" and then "Bluetooth" from the Wireless & Networks section.
Step 3
Tap "Off" to turn Bluetooth on and then tap "Not Visible to Other Bluetooth Devices" to make the Android phone discoverable for two minutes.
Step 4
Click the Start button on your computer, "Devices and Printers" and then "Add a Device."
Step 5
Select your Android phone from the list and click "Next" to run the wizard and pair your phone.
Step 6
Press the "Back" button, tap "More..." from the Wireless & Networks section and select "Tethering & Portable Hotspot."
Step 7
Check "Bluetooth Tethering" to share your phone's Internet.
3 ක්රමය.
පෝර්ටබල් වයි ෆයි හොට්ස්පොට්
-මේකට ඉතිං ඔයාලාගේ කොම්පීතරේ වයිෆයි තියෙන්න ඕනි. නැතිනම් රුපියල් පන්සීයකට විතර මාර්කැට්ටුවෙන් වයි ෆයි ඩොංගලයක් අරගෙන ඒකට අදාළ ඩ්රයිවර්ස් කොම්පීතරේට ඔබන්න. දැන් වැඩේ පට්ටාන් ගනිමු.
1) සෙටිංස් වල වයර්ලස් ඇන්ඩ් නෙට්වර්ක් කනෙක්ෂන් තෝරන්න.
2) මෝ තෝරලා ටෙදරීන් පෝටබල් හොට්ස්පොට්.
3) දැන් පෝටබල් වයි ෆයි හොට්ස්පොට් නැතිනම් පෝටබල් වී ලෑන් හොට්ස්පොට්.
4) කන්ෆිගර් වයි ෆයි හොට්ස්පොට් හෝ කන්ෆිගර් වී ලෑන් හොට්ස්පොට්.
5) දැන් නෙට්වර්ක් එකට නමක් දීලා, කැමති සෙකිරිටියක් තෝරලා, පාස්වර්ඩ් දාලා සේව් කරන්න.
6) කොම්පීතරේනෝටිෆිකේෂන් ඒරියා එකේ තියෙන නෙට්වර්ක් අයිකන් එක ක්ලික් කරලා අදාළ නෙට්වර්ක් තෝරලා, පාස්වර්ඩ් දීලා අන්තර්ජාලයට කනෙක්ට් වෙන්න.
Portable Wi-Fi Hotspot
Step 1
Press "Home" and then "Menu."
Step 2
Touch "More..." from the Wireless & Networks section and tap "Tethering & Portable Hotspot."
Step 3
Check "Portable Wi-Fi Hotspot." On some Android phones, this option is called "Portable WLAN Hotspot."
Step 4
Tap "Configure Wi-Fi Hotspot" or "Configure WLAN Hotspot."
Step 5
Enter your preferred SSID network name, security mode and password in the configuration screen. Tap "Save."
Step 6
Click the "Network" icon in the Windows 7 Notification area, select the SSID name you chose on your phone, click "Connect" and enter the password to connect to your phone's data plan.
එහෙනම් කොරලා බලන්න. පුරස්නයක් තිටයනවනම් කොමෙන්ටුවක් කොටන්න. සැමට ජය.


No comments:
Post a Comment
ඔබගේ අදහස්, යෝජනා, චෝදනා පහතින් කොටලා යන්න.